This is going to be a bit of a long article. This is a compilation of a series of articles I did for my website that was intended to guide the new handgun owner in the very basics of handgun marksmanship. These articles do not replace competent instruction by a qualified firearms instructor.
If you are new to firearms and especially handguns, I highly recommend that you take the NRA Basic Pistol Course.
Different organizations and groups describe the fundamental safety rules in different ways, but the following five will cover it all.
Safety
1. All firearms are considered loaded (never assume anything – check it)
2. Always point firearms in a safe direction (downrange, the ground, etc.), until on target and ready to fire
3. Always keep your trigger finger straight along the frame and off the trigger until on target and make a conscious decision to shoot.
4. Always know your target and what’s behind it (bystanders, traffic, etc.)
5. Maintain control of your firearm (if not in possession, lock it up)
Position
In basic handgun classes such as the NRA Basic Pistol, Arizona CCW, or Intro to Defensive Pistol, the shooter is introduced to the concept of positions. These are usually from the bench, the Isosceles, and the Weaver/Modified Weaver. It is important for the new shooter to get a good basic foundation of the fundamentals of marksmanship prior to taking advanced classes that will prepare him/her for a serious social confrontation. And it is critical that the beginning shooter get a good, solid foundation in assuming and properly using whichever of the standard positions he chooses to learn the basics in.
Positions are important. Only a solid, stable, and comfortable position will allow you to properly learn and implement the critical skills of sight alignment, and trigger control. Not to mention more practical skills such as double-tapping, malfunction clearance and rapid reload. Unfortunately, many shooters never progress beyond that. They spend serious time, effort, and money (in ammunition) developing excellent defensive marksmanship skills, all from their favorite “position”
The two basic positions to learn handgun marksmanship from are the Isosceles and Weaver.
 In the Isosceles, shown to the left, the shooter faces to target
 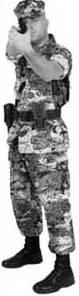 squarely and extends both arms out toward the target with both arms locked.
In the Weaver, or a modified Weaver, you are at a 45 degree angle to the target and only the firing arm is locked.
If you are serious about learning to defend yourself or your loved ones with a handgun, do you honestly think you are going to be able to communicate to the aggressor “Stop! I need to get into my perfect Weaver Stance”? Of course not. Most violent attacks are extremely fast and extremely close. So what is the point of learning “Positions”? Once again, to give you a firm physical foundation to learn the basic skills from. But just like an infant eventually needs to be weaned from the bottle and begin eating solid food, anyone serious about carrying a handgun for self defense needs to learn to use that handgun effectively without being in that perfect “position”.
You need to learn to shoot while moving (which is what you should be doing if under attack) from a barricade, from a car window, ect. So how do you learn these skills? You either take classes in them from instructors who offer these skills, or you study on your own from any number of excellent books on the market. Taking the classes is much easier. Studying the books alone will take longer, cost a lot more in ammunition, and you run the danger of inadvertently learning bad habits that only a skilled instructor can notice and correct. The books are great to reinforce what you learn in professional training.
Those of you who live in or near the Valley of the Sun are fortunate to have a large number of excellent instructors available to choose from. If you are carrying your handgun for self defense and the only level of training you have is a CCW or an NRA basic course, you are fooling yourself if you think you are really prepared to defend yourself with it. I’m certainly not trying to offend anyone, but I would rather ruffle your feathers and hopefully get you motivated to get the best training, than to hear about you being killed in a violent assault. Master your position and the fundamentals of shooting from it. Then learn to shoot from any position you find yourself in in an emergency.
A Proper Grip
Gripping a handgun properly may seem to be a mundane subject, but it might mean the difference between making a good defensive shot or punching holes in the sky or mowing the grass all the while bleeding out to a perfect state of dead. A proper grip should accomplish the following:
1. Maximum control of the hand gun in order to fire the shot and follow through.
2. Allow the recoil to go straight up the center of the firing arm.
3. Allow for proper placement of the trigger finger in order to pull the trigger straight to the rear.
In this illustration, the shooter has a one handed grip. 
The web of the hand is as high up on the frame of the pistol as it will go. The three fingers wrapping the front of the grip should be pulling straight to the rear. The trigger finger should be placed on the trigger so that he can pull the trigger straight to the rear. Too much trigger finger and you will pull shots to the right. Too little trigger finger and you will push shots to the left. If you looked straight down on his arm from above, the slide and barrel axis should follow the axis of the arm. ie: one straight line. The thumb position illustrated would be correct for one hand shooting, but NOT for two handed shooting where the thumb should be held high with the supporting hand thumb underneath it.
Beginning shooters often have difficulty determining how hard to grip the pistol. You want to grip hard enough to control the pistol, but not so hard that your hand shakes.
A good drill to learn the proper grip pressure is to grip the pistol in a proper grip and then increase the grip pressure until your hand begins to shake. Then relax a bit until the shaking stops. That should be about right.
In this illustration the shooter has assumed a two handed position. 
The supporting hand fingers wrap around the firing hand fingers as illustrated. Do not grip with the supporting hand. Notice that the firer has his trigger finger off the trigger and on his “index point” The index point is that place on the firearm frame that your trigger finger stays until you are aligned with the target. And it should be the same place consistently. Another thing you wish to avoid is “milking” the grip. This means increasing and decreasing the grip pressure. Often times, an inexperienced shooter will release the grip each time the pistol fires and then increase it giving a “milking” effect. His changes the grip for each shot causing a different point of impact.
When practicing drawing it is essential that the shooter begin slow enough to insure that he gets a proper grip before withdrawing the handgun from the holster. With practice, it will be smooth, fast, and a proper grip each time. And that may just save your life.
Sight Alignment
There are a number of basic marksmanship fundamentals that contribute to shooting one good shot, or a string of good shots, but sight alignment and trigger control are, in my opinion, the TWO critical actions that must work properly together. All of the other elements such as stance, position, grip, breath control ect. are nothing more than enhancers to enable these two fundamentals to work.
First, you have to accept one basic concept: That the human eye cannot focus on more than one distance at a time. You have three items on the focal plane: Target, front sight, and rear sight. Without belaboring the mathematical issues involved, just trust me that your focus must be on the front sight!
Second, you need to understand the concepts of sight alignment and sight picture. Sight alignment is aligning the front sight properly in the rear sight notch. Sight picture is taking those two aligned sights and placing them on the target you are shooting .O.K. So what does all of this actually look like?
When you focus on the target, both sights are indistinct.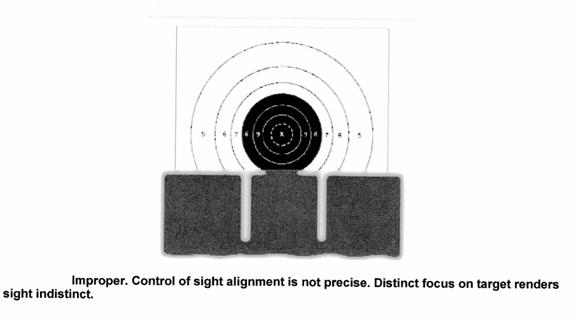
This causes you to have misses that you can’t understand, because you are not really seeing where the sights are aligned at the instant the weapon fires.

Nope, still wrong answer.

Now we are getting somewhere. By keeping your focus on the front sight, you accomplish not only proper sight alignment, but you can also maintain a proper sight picture.
Here is a good example of what you should be seeing.

O.K., so now we know how to keep our sights properly aligned on the target for one good shot, or a string of good shots. And you need to get this fundamental ingrained into your training. But in a serious life and death confrontation, you are not going to have the time to perfectly line up your sights for that perfect shot. That’s when you use a flash sight picture. Look, a serious armed confrontation is going to be at very close range, perhaps even as close as arm’s length. The sights don’t have to be perfectly aligned. As long as you can see some portion of the front sight in the rear notch and can place it on the target, you will get an effective hit. The assailant isn’t going to know, (or care) that you didn’t drill him perfectly through the third button of his shirt but instead were about 3 inches to the left. Let’s look at what I mean.

If you imagine that the circular targets are the width of an average chest at close range, you can see that at realistic combat ranges the sights do not have to be perfectly aligned to get a good solid hit. Try this the next time you go to the range and train with your particular pistol. Try mis-aligning the sights slightly in all directions at close range to see where you and your handgun hit.
Trigger control
I spent 8 of my years in the Army as a professional marksmanship instructor/shooter shooting NRA outdoor 3 gun pistol (as well as teaching combat weaponcraft and sniping) For those who have never tried it, it is a precision form of shooting that leaves little room for error when it comes to the fundamentals. All forms of shooting utilize the same basic fundamentals of marksmanship in one form or another.
Trigger control is the last “final act” of shooting one good shot, or a string of good shots, Many shooters are able to employ the other basic fundamentals such as position, breath control, grip, and sight alignment properly but then ruin a shot with improper trigger manipulation. Often called “jerking the trigger” or “flinching”, this is a bad habit that the shooter is often unaware of. (Usually because they are not properly watching the sights, So what are the causes of improper trigger control? It is usually one of two problems. Either the shooter is trying to “set up” the shot, or it is a reaction to the anticipated recoil or noise of the shot.
When a shooter tries to set up the shot, they align the sights properly, and then snatch the trigger hoping to hit the aiming point before the sights go out of alignment. It is important to accept that no one can hold a firearm perfectly still. Your body is going to move some do to heartbeat. That is called “arc of movement” Just keep the front and rear sights aligned and the aligned sights will actually stay in the aiming area. If you try to “make” it good, you will “make” it go off the aiming area.
Flinching in anticipation of noise or recoil is the second major reason for poor trigger control. This is found often in new shooters, especially those who are trying to master a large caliber weapon that is perhaps painful to shoot, before instilling the basic fundamentals into their skill sets. Having good hearing protection while live firing is important.
Trigger finger placement is very important. The idea is to find that spot on the trigger where you can pull the trigger straight to the rear. Too much finger and you will tend to pull the shots to the right (right handed shooter). Too little, and you will tend to push the shots to the left.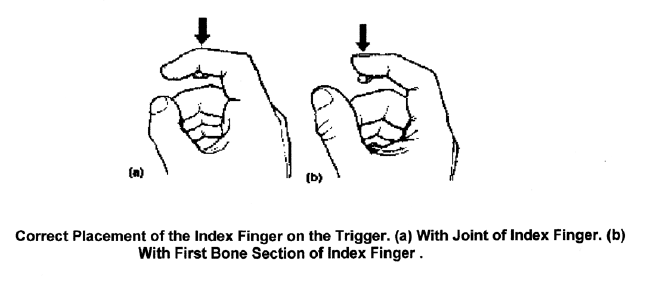
Ideally, you are watching the sights, focusing on the front sight and applying steady, even pressure on the trigger until the round goes off as a surprise shot.
Dry Firing (practicing the fundamentals without using live ammunition) is the most important training technique you can use to develop good marksmanship fundamentals.
If you are truly watching the sights correctly, as you apply trigger pressure you can see whether the sights stay aligned as the hammer falls.
Note: Always remember the basic safety rules for dry firing. NO live ammunition in the same room that you are training in! Weapon properly cleared in a safe direction. (Check and TRIPLE check it!) Weapon pointed in a safe direction when dry firing!
An analogy to describe good trigger control is comparing it to when you use an eye dropper for the first time. You usually anticipate the liquid going into your eye as you squeeze the rubber bulb and “flinch” causing the water to go everywhere except your eye.
Once you get used to holding the eye dropper still (sights) you squeeze the rubber bulb (trigger) and wait patiently for the liquid to go into your eye (shot on target).
Breath Control
I want to cover proper breathing techniques both in range training and life and death defensive shooting.
When training to improve your marksmanship on the range, breathing is a matter of rhythm. As you prepare to shoot, breathe in normally, and then exhale normally. Don’t “hold” your breath as this requires muscular tension which will increase your arc of movement. Once you exhale normally, you have an approximate 8 second window to complete the shot before you body is going to want to breathe again. The longer you wait after 8 seconds, the worse your discomfort. If you haven’t executed the shot by then, lower the gun, begin breathing again and start over. After awhile, this rhythm will become natural. When confronted with a stressful situation, remember to breathe. Don’t hold your breathe, keep oxygen coming in, and stop when you need to shoot.
Shooting competitive combat matches is good training for this, and it is difficult to describe with just the written word.” Tactical Breathing” is a technique to get your body back under control. It is used when you have a lull in the situation. It is even a good stress reliever at work. It is composed of a 3x3x3 rhythm. Breathe in slowly through your nose for a count of three seconds. Hold your breath for three seconds. Exhale slowly through you mouth for three seconds. Do this three times and you will be surprised at the effect. Go ahead! Try it right now.
Follow Through
Follow through is one of the more difficult shooting techniques to teach because it cannot be easily demonstrated, and is difficult to clearly explain as well.
But it is a very important part of learning to be a good shot. And it is a concept used in many sports such as golf or baseball. Many shooters will employ the fundamentals correctly, fire the shot, and wonder why they are not hitting the target where they want. They are not following the shot through. The concept is similar to the martial artist who strikes through his target. He isn’t really finished just as his hand hits the target.
One way of describing follow through for shooters is that no shot is finished until your sights are lined back up on the target, the trigger is reset, and you are ready for your next shot. The sequence goes like this.
1. Breath, relax, settle into position on the target.
2. Pick up the front sight and focus on it.
3. Steady pressure on the trigger, Front sight, front sight, front sight, BANG!
4. Pistol goes into recoil, you maintain the SAME grip, and continue to hold the trigger back.
5. As the pistol comes back into battery, you pick up the front sight, focus on it, slightly release the trigger until it resets (no more than that) and prepare for the next shot. If you are not going to shoot again, you can relax.
Everything after “Bang” is follow through.
Learning to properly utilize a handgun to defend yourself or you family takes commitment and a bit of work. But it is worth it when you save your own or anther person’s life.
And never forget, safety is the most important skill!

Pingback: Fundamentals of Handgun Marksmanship | Azweaponcraftprepper